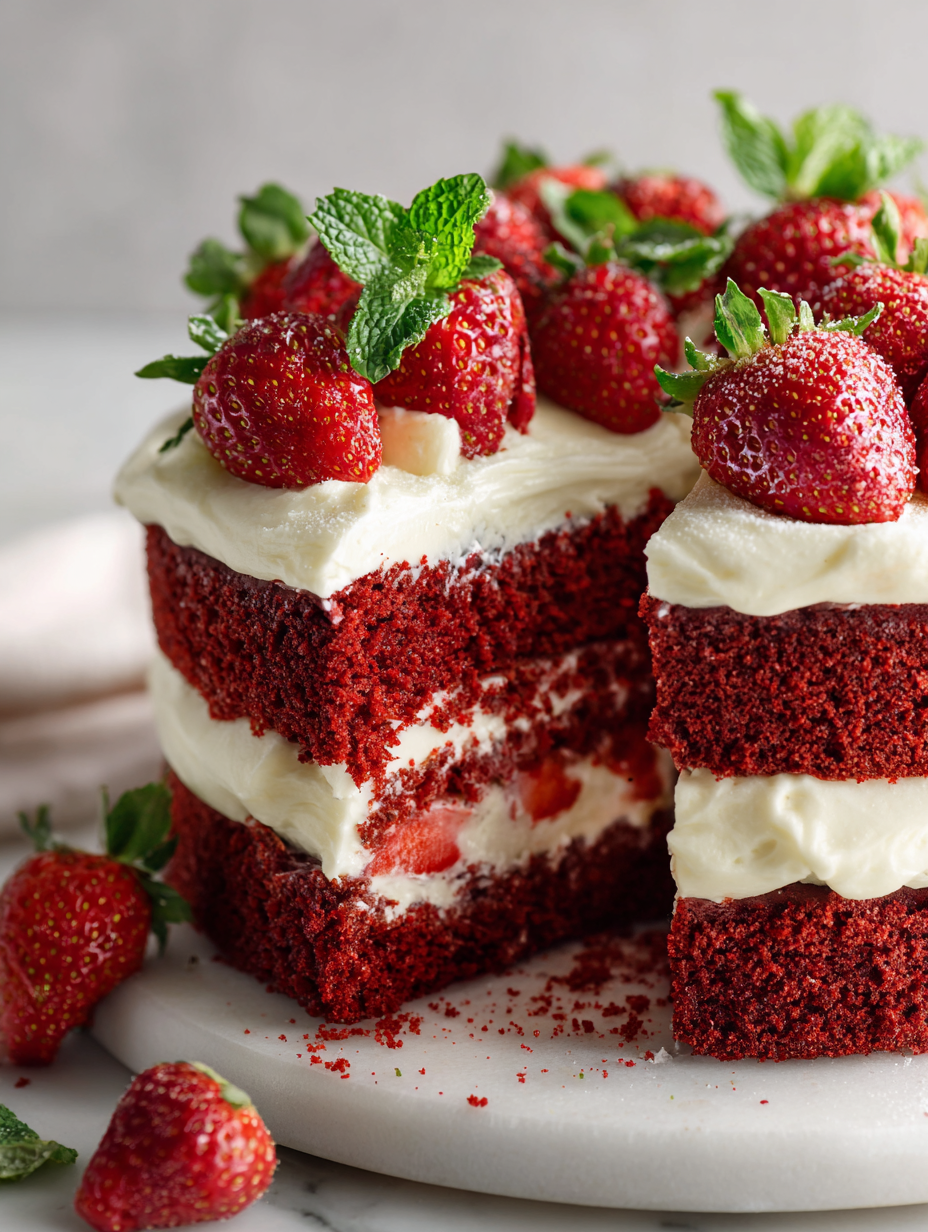
This Red Velvet Strawberry Cake is my go-to when I want something that surprises the palate. The deep, cocoa-rich cake layers are softly tangy with a hint of sweetness, but it’s the fresh strawberries that really make it sing. I love how the fruit cuts through the richness, adding a bright, almost zesty note that keeps each bite lively.
I didn’t set out to combine these flavors, honestly. One afternoon, I had a bunch of ripe strawberries and a craving for red velvet, and somehow, they just clicked. The result is a cake that feels indulgent but also refreshingly balanced. It’s perfect for spring celebrations or whenever you’re craving something both familiar and unexpected.
Focusing on the unexpected harmony of tangy strawberries and rich, velvety cocoa in a layered cake that balances decadence with fresh fruit brightness.
The story behind this recipe
- This cake idea came from a spontaneous kitchen experiment. I had fresh strawberries and wanted to do something more than just toss them on top. The idea of blending their bright, juicy flavor into a red velvet base felt daring but right.
- One summer afternoon, I sliced strawberries and let their scent fill the air as I mixed batter. The aroma of cocoa and ripe berries mingling was pure comfort. Seeing the layers come together with that vibrant red was a small thrill—like capturing a fleeting moment of joy in the kitchen.
- It’s a cake born from curiosity and a bit of chaos. Sometimes, the best flavors emerge when you’re not overthinking. Now, it’s become my favorite way to celebrate spring’s arrival or just break up a plain weekend.
Ingredient breakdown
- Cream cheese: I love how its tangy richness gives the frosting a velvet-like texture, but if you want a lighter touch, swap part of it with Greek yogurt—just expect a slightly tangier finish.
- Strawberries: Ripe, juicy strawberries are key here, their bright, sweet aroma waking up the cake. For a more intense flavor, macerate them briefly in a splash of lemon juice before folding in.
- Cocoa powder: Unsweetened cocoa deepens the cake’s velvety tone and adds a smoky undertone. Sift it well to avoid lumps, and if you prefer a milder cocoa, swap half for Dutch-processed cocoa for a smoother flavor.
- Buttermilk: It keeps the cake tender and moist, with a subtle tang that balances the sweetness. If unavailable, substitute with milk plus a teaspoon of lemon juice—just give it a stir and wait five minutes for it to curdle.
- Red food coloring: I use gel for vibrant, uniform color without thinning the batter. If you want to skip artificial dyes, try beet juice for a natural hue—just expect a slight earthy note.
- Sugar: I prefer superfine sugar for a smoother crumb, but granulated works fine. Adjust according to your sweetness preference; less sugar if your strawberries are very ripe.
- Eggs: They provide structure and richness, but if you’re egg-free, a flaxseed or chia seed slurry can stand in—just double the amount and let it sit until gel-like.
Spotlight on key ingredients
Strawberries:
- I love how their juicy, bright aroma bursts through each bite, adding a natural sweetness and a slight tartness. When baked, they soften and release a fragrant, ruby-red juice that clings to the cake layers.
- Cocoa powder: Unsweetened cocoa deepens the cake’s velvety texture and introduces a smoky, bittersweet note. Sifting it well prevents lumps, and its aromatic richness is instantly recognizable as the backbone of any good red velvet.
Cocoa powder:
- Cream cheese: Its tangy, velvety richness balances the sweetness and lends the frosting a smooth, luscious texture that’s slightly tangy with a hint of dairy sweetness. When whipped, it becomes soft and spreadable, almost melting in your mouth.
- Besides flavor, it acts as a natural coloring agent, intensifying the cake’s deep red hue. Its slightly grainy texture dissolves when mixed thoroughly, and the smoky aroma enhances the overall decadence of the cake.
Notes for ingredient swaps
- Dairy-Free: Swap cream cheese with plant-based cream cheese or coconut cream for a similar tangy creaminess, but expect a slightly different texture and flavor profile.
- Strawberries: Use frozen strawberries if fresh aren’t available—just thaw and drain excess moisture. For a deeper berry flavor, try raspberries or blackberries.
- Cocoa Powder: Dutch-processed cocoa gives a smoother, less acidic taste; natural cocoa adds a brighter, sharper chocolate flavor. Adjust sweetness accordingly.
- Buttermilk: Substitute with milk plus 1 teaspoon lemon juice or vinegar—this will curdle slightly, mimicking the tang of buttermilk, but may be a touch thinner.
- Red Food Coloring: Use beet juice or powder for a natural hue—expect a slightly earthy note and a less vibrant color, but a more subtle, natural look.
- Sugar: Coconut sugar or honey can replace granulated sugar for a different sweetness and moisture, though they may slightly alter texture and color.
- Eggs: Aquafaba (cooked bean liquid) can work as an egg replacer, but may result in a slightly different crumb—use 3 tablespoons per egg.
Equipment & Tools
- Oven: Bake the cake layers evenly and thoroughly.
- Cake pans (20cm/8-inch): Shape the cake layers uniformly.
- Mixing bowls: Combine ingredients separately for control.
- Electric mixer or whisk: Cream the frosting and blend ingredients smoothly.
- Spatula: Fold ingredients and spread frosting.
- Cooling rack: Cool the cakes evenly and prevent sogginess.
- Knife or cake leveler: Level the cake layers for a tidy build.
Step-by-step guide to making the cake
- Preheat your oven to 175°C (350°F). Grease and flour three 20cm (8-inch) round cake pans, or line with parchment paper.
- In a large bowl, sift together 2 ½ cups (310g) all-purpose flour, ¾ cup (75g) unsweetened cocoa powder, 1 teaspoon baking soda, ½ teaspoon salt. Mix well.
- In a separate bowl, whisk 1 cup (200g) granulated sugar, 1 cup (200g) superfine sugar, 3 large eggs, 1 teaspoon vanilla extract until combined and slightly frothy.
- In another small bowl, combine 1 cup (240ml) buttermilk, ½ cup (120ml) vegetable oil, and 2 tablespoons (30ml) red gel food coloring. Whisk until smooth.
- Gradually add the wet ingredients into the dry, mixing on low speed or with a spatula until just combined. Do not overmix—lumps are okay.
- Fold in the chopped strawberries (about 1 cup, roughly chopped) gently, being careful not to crush them. The batter will be thick but moist.
- Divide the batter evenly among the prepared pans. Smooth the tops with a spatula. Bake for 25–30 minutes, or until a toothpick inserted in the center comes out clean and the edges are set.
- Remove from oven and let the cakes cool in pans for 10 minutes. Then, transfer to a wire rack and cool completely, about 1 hour.
- While cakes cool, prepare the frosting: beat 8 oz (225g) cream cheese with 1/2 cup (115g) softened butter until smooth. Gradually add 2 cups (250g) powdered sugar and 1 teaspoon vanilla. Mix until creamy and fluffy.
- Once cooled, level the cakes if domed. Spread a layer of frosting between each cake layer, then cover the top and sides smoothly. Decorate with fresh strawberries if desired.
- Let the assembled cake rest in the fridge for at least 30 minutes before serving to set the frosting. Bring to room temperature before slicing.
Let the assembled cake rest in the fridge for at least 30 minutes to set the frosting. Before serving, bring it to room temperature for fuller flavor and better texture. Slice with a sharp knife, wiping it clean between cuts to keep edges neat.
How to Know It’s Done
- Cake edges are lightly golden and a toothpick comes out clean.
- Frosting is smooth and holds shape without sagging.
- Strawberries are evenly distributed and visible in the layers.
Red Velvet Strawberry Cake
Ingredients
Equipment
Method
- Preheat your oven to 175°C (350°F). Grease three 20cm (8-inch) round cake pans and set aside.
- Sift together the flour, cocoa powder, baking soda, and salt in a large bowl. This ensures an even, lump-free batter and vibrant color.
- In a separate bowl, whisk the granulated sugar, superfine sugar, eggs, and vanilla until the mixture is light, fluffy, and slightly frothy, filling the air with a sweet aroma.
- Combine the buttermilk, vegetable oil, and red gel food coloring in a small bowl, whisking until smooth and vividly colored.
- Gradually add the wet mixture into the dry ingredients, folding gently with a spatula just until combined. The batter will be thick and glossy with a deep red hue.
- Gently fold in the chopped strawberries, being careful not to crush them so they stay juicy and visible in the batter.
- Divide the batter evenly among the prepared pans, smoothing the tops for a level finish. Bake for 25–30 minutes, until a toothpick inserted in the center comes out clean and the edges are set.
- Remove the cakes from the oven and let them cool in the pans for about 10 minutes before transferring to a wire rack to cool completely—this prevents sogginess and helps set the layers.
- Prepare the frosting by beating the softened cream cheese and butter together until smooth and creamy. Gradually add the powdered sugar and vanilla, mixing until fluffy.
- Level the cooled cake layers with a knife or cake leveler. Spread a layer of frosting between each, then cover the top and sides smoothly with the remaining frosting.
- Decorate with additional strawberries or piping if desired. Chill the cake for at least 30 minutes to set the frosting, then slice and serve to enjoy a vibrant, luscious treat.
Pro tips for perfect cake
- Sift cocoa and flour together to avoid lumps and ensure even color distribution.
- Use room temperature eggs and butter for smoother mixing and better emulsion.
- Fold strawberries gently into the batter to keep their juicy integrity and prevent sinking.
- When frosting is too stiff, warm the spatula slightly to spread more smoothly.
- Chill the assembled cake for at least 30 minutes to help set the frosting and enhance flavor meld.
- For vibrant color, use gel food coloring—liquid dyes can thin the batter and dilute the color.
- When layering, use a cake turntable if available—saves time and gives a cleaner finish.
Common mistakes and how to fix them
- FAILED TO PROOFREAD: Check for typos and clarity to avoid confusion.
- USED TOO MUCH: Keep ingredient quantities precise for consistent results.
- OVERLOOKED TEMPERATURES: Always verify oven settings; too hot or cold affects baking.
- MIXED INCONSISTENTLY: Mix ingredients thoroughly but avoid overmixing to prevent a dense cake.
Quick fixes and pantry swaps
- If batter is too thick, splash in a little milk and stir gently.
- When frosting feels runny, chill it for 10 minutes to firm up.
- Splash vanilla extract into strawberries for an aromatic boost.
- Patch a cracked cake layer with a dab of frosting for a seamless look.
- Shield the cake with foil if edges start to over-torch during baking.
Prep, store, and reheat tips
- Prepare the frosting and refrigerate up to 24 hours; it firms up but stays creamy, making assembly smoother.
- Bake the cake layers a day ahead; store wrapped tightly in plastic wrap at room temperature for up to 24 hours or freeze for 1 month.
- Slice strawberries and macerate in lemon juice a few hours before assembling to intensify their brightness and juiciness.
- Refrigerate the fully assembled cake for at least 30 minutes to set the frosting; bring to room temp before slicing for best texture.
- Reheat slices gently in the microwave at 15-second intervals; the cake softens and flavors meld, releasing a warm, sweet aroma.
Top questions about Red Velvet Strawberry Cake
1. Can I use frozen strawberries?
Use fresh, ripe strawberries for the best flavor and juiciness. Frozen can work, but thaw thoroughly and drain excess moisture.
2. Can I bake this at a different temperature?
Yes, but reduce the oven temperature slightly—around 165°C (330°F)—and increase baking time by 5–10 minutes, watching for doneness.
3. How do I know when the cake is done?
A layer of frosting should be smooth and set after chilling. When sliced, the cake should hold together without crumbling.
4. My frosting is too soft, what now?
If your frosting is too runny, chill it for 10–15 minutes until it firms up before spreading.
5. Can I skip or substitute food coloring?
Use gel food coloring for vibrant, consistent color without thinning the batter. Natural dyes like beet juice work but may dull the color.
6. How long can I keep the cake in the fridge?
Store the cake covered in the fridge for up to 2 days. Bring to room temperature before slicing for better texture.
7. What if my cake cracks?
If the cake cracks while cooling, gently press the crack shut and patch with frosting. Chill again to set.
8. Can I make the frosting lighter?
For a lighter frosting, substitute part of the cream cheese with Greek yogurt, but expect a tangier flavor.
9. How can I enhance strawberry flavor?
Add a splash of lemon juice to strawberries before folding into batter to heighten their brightness and flavor.
10. How do I get clean slices?
Use a serrated knife for clean slices. Wipe the blade between cuts for neat, tidy servings.
This cake isn’t just a dessert; it’s a little celebration of unexpected harmony. The blend of tangy strawberries with velvety cocoa creates a flavor that feels both nostalgic and fresh, perfect for spring gatherings or just a cozy weekend. I love how it makes the kitchen smell—rich chocolate and sweet berries mingling in the air, promising something special.
Sharing this cake feels like sharing a small secret. It’s simple enough to make on a busy day but special enough to feel like a treat. Sometimes, the best desserts are born from a little chaos and a lot of honest, straightforward love for good ingredients.

Hi, I’m Katie Dawson, the owner, cook, and storyteller behind Little More Lovely. I run a small café in a cozy corner of Seattle, where the smell of freshly baked bread meets the hum of neighborhood chatter. I’ve spent years learning how food can bring people together, both as a professional and as someone who loves to share meals with family and friends.

