This shrimp linguine isn’t your average pasta night. It’s a little dance of acidity and richness, something I’ve been playing with for years. I love how a splash of lemon can cut through the creamy sauce, making every bite feel fresh and lively, even when I’m craving comfort food.
I’ve learned that balancing those bright, zingy notes with warm, savory shrimp takes a gentle hand. It’s not about overpowering but elevating. Sometimes, it’s the simplest tweaks—like adding a dash of chili or a sprinkle of herbs—that turn a straightforward dish into something memorable, even in the chaos of a busy weeknight.
Focusing on the overlooked art of balancing acidity and richness in shrimp linguine, this recipe emphasizes the transformative power of a splash of lemon and a touch of chili to brighten and deepen each bite. It’s about elevating comfort food with a few simple, honest tweaks that make all the difference.
Elevating Comfort with Bright Flavors
- There’s something about the way the lemon zest lifts the shrimp, it’s like a little burst of sunshine on a dull day.
- I still remember the chaos of my first attempt—burned garlic, overcooked pasta—but that messy plate tasted better than any perfect one.
- Cooking this dish feels like a small act of rebellion against my busy schedule; it’s quick but feels indulgent.
- I love how a pinch of chili flakes can turn a simple meal into something that makes my nose tingle and my smile grow.
- Every time I make this, I get a little proud—like I’ve cracked a secret to turning everyday ingredients into something special.
The story behind this recipe
- This dish was born out of a lazy Sunday afternoon when I had a handful of shrimp and a craving for something bright and satisfying. I wanted to make it feel special without fuss, kind of a reminder that quick can still be thoughtful.
- Some of my best moments in the kitchen are those accidental tweaks—adding a squeeze of lemon or a pinch of chili—things I didn’t plan but now swear by. It’s like those small surprises turn a simple pasta into a little celebration.
- heading
- story_type
Trivia and Origins of Shrimp Linguine
- Shrimp linguine traces its roots to Italian coastal kitchens where fresh seafood and pasta came together effortlessly.
- The dish became popular among sailors and fishermen who needed quick, nourishing meals after long days at sea.
- In some regions, a splash of lemon and chili was added to cut through the richness of seafood, creating a vibrant flavor balance.
- This recipe gained modern fame in the early 2000s as part of the resurgence of simple, bright Italian-inspired pasta dishes.
Key Ingredient Insights
- Shrimp: I prefer peeled, deveined, and fresh—look for a firm texture and a sweet aroma. Skip if you want a milder seafood flavor.
- Linguine: I love that slight chew; cook until just al dente—about 9 minutes in boiling salted water. Use spaghetti if you prefer a thinner bite.
- Garlic: Fresh garlic is key—smell that pungent, warm aroma as it hits the oil, not burnt. Crush it well for even flavor.
- Lemon: Bright yellow and plump; zest and juice add zing. If you only have bottled lemon, add extra zest for vibrancy.
- Chili flakes: I like a gentle heat—start with a pinch, then go up if you want more. They add a smoky, tingling warmth.
- Olive oil: Use good-quality extra virgin—rich, fruity aroma that carries through the sauce. Skip cheap oil, it’s noticeable.
- Parsley: Fresh, bright green leaves—chop finely for a fresh herbal burst that balances the richness.
Spotlight on key ingredients
Shrimp:
- I prefer them peeled and deveined—seek firm texture and a sweet, oceanic aroma. They behave best when they’re fresh, not frozen—cooks quickly and stays tender.
- Lemon: Bright yellow and plump; zest and juice add lively brightness. The zest releases fragrant oils, making each bite more vibrant—skip bottled for the best zing.
Lemon:
- Linguine: Slightly thicker than spaghetti, it holds sauce well. Cook until just al dente—about 9 minutes—so it doesn’t turn mushy, and always toss in a bit of pasta water for gloss.
- Garlic: Fresh garlic gives that warm, pungent aroma that wakes up the dish. Crush it well, watch it turn golden quickly—burnt garlic turns bitter fast, so stay attentive.
Notes for ingredient swaps
- Dairy-Free: Swap butter for olive oil in the sauce for a richer, fruitier flavor without dairy.
- Gluten-Free: Use rice pasta or zucchini noodles instead of linguine—less chewy, but still satisfying.
- Shellfish Alternative: Substitute scallops or firm white fish if shrimp isn’t available—mild, tender, and still tasty.
- Lemon Variations: Lime or vinegar can brighten the dish; lime adds a slightly different citrus note, vinegar gives a sharper tang.
- Spice Level: Use smoked paprika instead of chili flakes for a smoky warmth, or omit entirely for milder flavor.
- Herb Swap: Basil or tarragon can replace parsley—each adds their own aromatic twist, but parsley keeps it classic.
- Oil Choice: Avocado oil or toasted sesame oil can add nutty or smoky undertones, but use sparingly to not overpower.
Equipment & Tools
- Large skillet: For cooking shrimp and making the sauce evenly.
- Pasta pot: Boiling water for linguine.
- Slotted spoon: Handling shrimp during cooking.
- Tongs: Tossing pasta and finishing the dish.
Step-by-step guide to Shrimp Linguine
- Equipment & Tools: Gather a large skillet (about 30cm/12in) for even heat distribution, a pasta pot, a slotted spoon for shrimp, and tongs for tossing.
- Boil water: Fill your pot with salted water—about 4 liters, salt like the sea—bring to a rolling boil around 100°C/212°F.
- Cook pasta: Add linguine, cook for 9 minutes until just al dente, drain, and set aside, saving a cup of pasta water.
- Prep shrimp: Pat shrimp dry, season lightly with salt, pepper, and a sprinkle of chili flakes for a hint of heat.
- Sauté garlic: Heat 2 tbsp olive oil over medium heat (about 160°C/320°F). Add 3 minced garlic cloves, cook until fragrant—about 30 seconds—don’t let it brown.
- Cook shrimp: Push garlic aside, add shrimp in a single layer, cook for 2-3 minutes per side until pink and opaque, then remove and set aside.
- Build sauce: In the same pan, add a squeeze of lemon juice, a pinch more chili flakes, and a splash of pasta water (about 1/4 cup). Stir and scrape up browned bits.
- Finish pasta: Add drained linguine to the skillet, toss with sauce, shrimp, and chopped parsley. Adjust consistency with more pasta water if needed, cook for 1-2 minutes until coated and glossy.
- Check doneness: Look for a vibrant, slightly saucy pasta with shrimp that are firm and pink. Smell the lemon and garlic meld.
- Rest & plate: Serve immediately, garnished with extra parsley and a twist of lemon. Rest for 1 minute to let flavors meld before plating.
Serve immediately, garnish with fresh parsley and lemon zest, and let the dish rest for a minute to meld flavors before plating.
How to Know It’s Done
- Shrimp: firm, opaque, pink with a slight bounce when pressed.
- Sauce: silky, coats pasta evenly, bright lemon aroma noticeable.
- Pasta: al dente, with a slight chew, no excess water pooled.
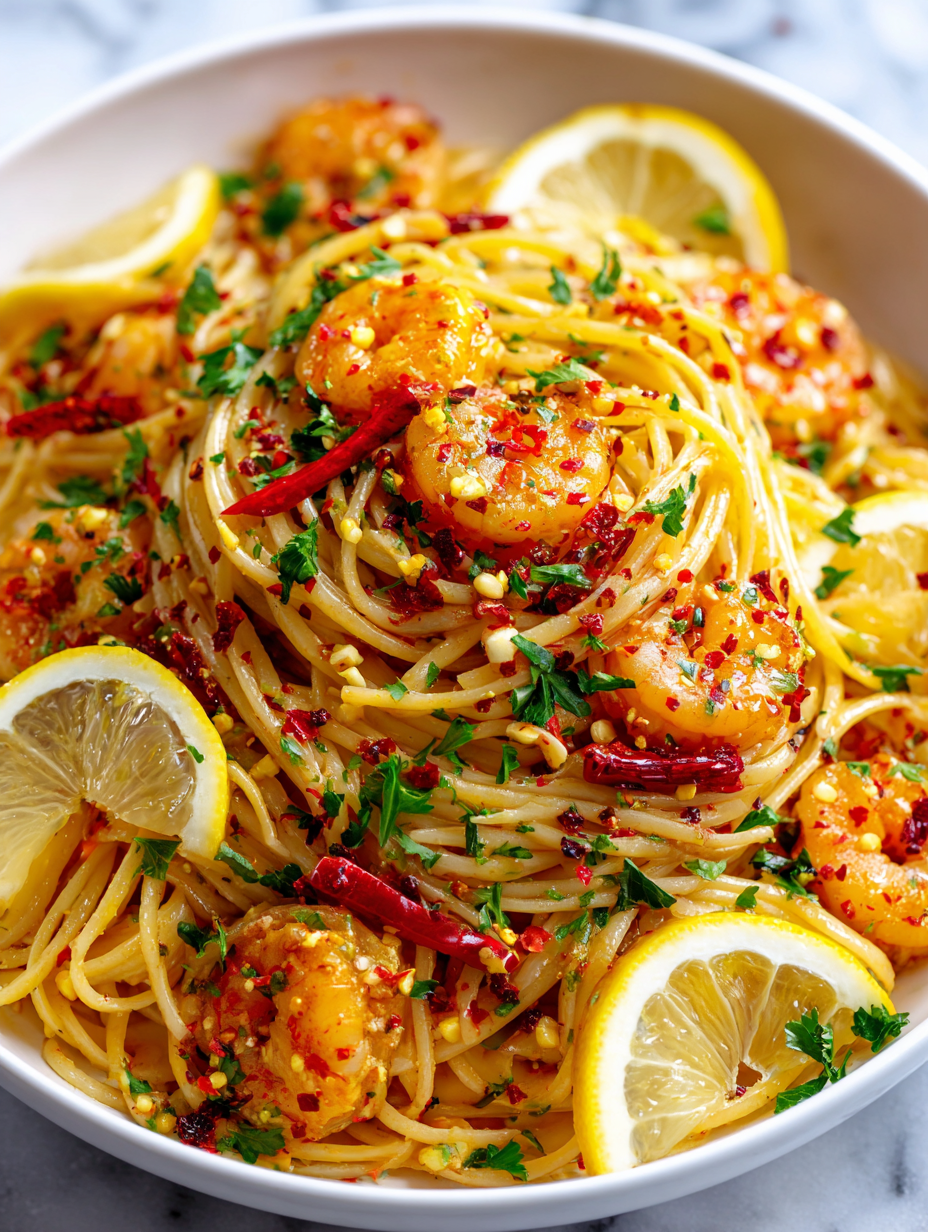
Lemon Chili Shrimp Linguine
Ingredients
Equipment
Method
- Bring a large pot of salted water to a rolling boil and cook the linguine until just al dente, about 9 minutes. Drain, reserving 1/4 cup of pasta water, and set aside.
- While the pasta cooks, pat the shrimp dry and season lightly with salt, pepper, and a pinch of chili flakes for a gentle heat.
- Heat the olive oil in a large skillet over medium heat until shimmering and fragrant. Add the minced garlic and cook for about 30 seconds, stirring constantly, until fragrant and just starting to turn golden.
- Add the seasoned shrimp to the skillet in a single layer. Cook for 2-3 minutes per side until pink, opaque, and slightly firm, then remove with a slotted spoon and set aside.
- In the same skillet, squeeze in the juice of one lemon and add the lemon zest. Stir to combine, scraping up browned bits from the bottom of the pan. Add the reserved pasta water to loosen the sauce and create a silky base.
- Return the cooked linguine to the skillet, tossing gently to coat the noodles in the bright, flavorful sauce. Cook for 1-2 minutes until everything is nicely combined and glossy.
- Add the cooked shrimp back into the skillet along with chopped parsley. Toss everything together and taste—adjust seasoning with more salt, pepper, or chili flakes if desired. The dish should smell fresh and bright, with a vibrant lemon aroma.
- Serve immediately, garnished with extra parsley and lemon zest for a fresh finish. Enjoy the lively contrast of acidity and richness in each flavorful bite.
Pro tips for perfect shrimp linguine
- Bolded mini-head: Use high heat to quickly sear shrimp, locking in juices and creating a slight caramelization.
- Bolded mini-head: Cook garlic gently over medium to avoid bitterness; it should become fragrant and slightly golden, not burnt.
- Bolded mini-head: Save pasta water before draining; its starchy quality helps thicken and unify the sauce.
- Bolded mini-head: Toss pasta and shrimp in the skillet off heat to prevent overcooking and preserve texture.
- Bolded mini-head: Add lemon juice at the end for a fresh burst—avoid cooking it too long to keep the brightness intact.
- Bolded mini-head: Use a splash of olive oil or butter at the end to create a glossy, flavorful coating on the pasta.
- Bolded mini-head: Rest the finished dish for a minute—this helps the flavors meld and prevents it from feeling too watery.
Common mistakes and how to fix them
- FORGOT to preheat the pan → Always heat your pan before adding ingredients.
- DUMPED all ingredients at once → Add ingredients gradually for better flavor control.
- OVER-TORCHED garlic → Cook garlic gently until fragrant, not browned or bitter.
- SKIPPED resting time → Let the pasta sit for a minute after tossing to meld flavors.
Quick fixes and pantry swaps
- If/When shrimp turn rubbery, quickly splash cold water to stop cooking.
- When sauce is too thin, stir in a pinch of grated Parmesan for thickness.
- Splash extra lemon juice if sauce feels dull and flat.
- Patch over-salted pasta by adding a few drops of water during reheating.
- Shield burned garlic by removing pan from heat immediately and starting fresh.
Prep, store, and reheat tips
- Prep shrimp: Peel and devein ahead of time; keep refrigerated for up to 1 day. The sweet aroma and firm texture stay fresh.
- Cook pasta: Boil linguine until just al dente, then toss with a little oil, cool, and store in an airtight container for up to 1 day. It’ll keep its slight chew.
- Make sauce components: Mince garlic and zest lemon in advance; store separately in airtight containers for up to 2 days. Aromatic oils and bright zest will still shine.
- Refrigerate leftovers: Store finished shrimp linguine in a sealed container for up to 2 days. Expect the sauce to thicken slightly and flavors to mellow.
- Reheating: Warm gently in a skillet over medium heat, adding a splash of pasta water or olive oil. Expect aromas of lemon and garlic to revive with a glossy finish.
Top questions about Shrimp Linguine
1. Can I use frozen shrimp?
Use fresh, peeled, deveined shrimp for the best flavor and texture. Frozen can work if thawed properly.
2. How long should I cook the pasta?
Cook linguine until just al dente, about 9 minutes. Overcooking makes it mushy, so keep an eye on it.
3. When should I add lemon juice?
Add lemon juice at the end for brightness. Cooking it too long can dull the fresh flavor.
4. What kind of oil should I use?
Use good-quality olive oil for a richer taste. Cheaper oils can make the dish feel flat and greasy.
5. How spicy should I make it?
Adjust chili flakes to your heat preference. Start small and add more if you like it spicier.
6. Why save pasta water?
Save a cup of pasta water before draining. It helps make the sauce glossy and helps it cling to the pasta.
7. How do I know when shrimp are done?
Don’t overcook the shrimp; they turn rubbery quickly. Cook until pink and opaque, about 2-3 minutes per side.
8. Can I use dried herbs instead of parsley?
Use fresh parsley for the best flavor and vibrant color. Chop finely to distribute evenly.
9. How do I reheat leftovers?
Reheat gently in a skillet with a splash of water or oil. Avoid microwaving to prevent overcooking the shrimp.
10. My sauce is too watery, what can I do?
If sauce gets too thin, stir in a tiny bit of Parmesan or a pinch of flour mixed with water to thicken.
This shrimp linguine isn’t just about quick comfort; it’s about capturing a bright, lively moment in the middle of a busy week. The lemon’s zing and the shrimp’s tender bite come together in a way that reminds me why I love cooking simple dishes that feel special.
Whenever I make this, I’m reminded that sometimes the best meals are the ones that come together effortlessly but taste like they took a little extra care. It’s a dish I keep coming back to, especially when I need that perfect balance of freshness and richness to get through the day.

Hi, I’m Katie Dawson, the owner, cook, and storyteller behind Little More Lovely. I run a small café in a cozy corner of Seattle, where the smell of freshly baked bread meets the hum of neighborhood chatter. I’ve spent years learning how food can bring people together, both as a professional and as someone who loves to share meals with family and friends.

